
Most mammalogy labs focus on morphology, diversity, and evolution, using skulls, skeletons, and study skins to demonstrate key concepts and teach differences between taxa. In this module you will learn some basics about museum collections and specimens, how to read dental formulae, the zoogeographic regions of earth, and how to identify specimens using a dichotomous key.
Jump down to:
Museum Collections and Specimens
One of the primary ways scientists study the morphology and diversity of animals is using remains of individual animals that were collected from wild populations and preserved in different ways for long term study and storage in museum collections. There are several ways to preserve an animal, but the two most common are (1) storing the original full body (or parts thereof) in fluid in jars or buckets and (2) skinning the animal, preserving the skin, and cleaning the bones in a dry state.
Fluid Preservation
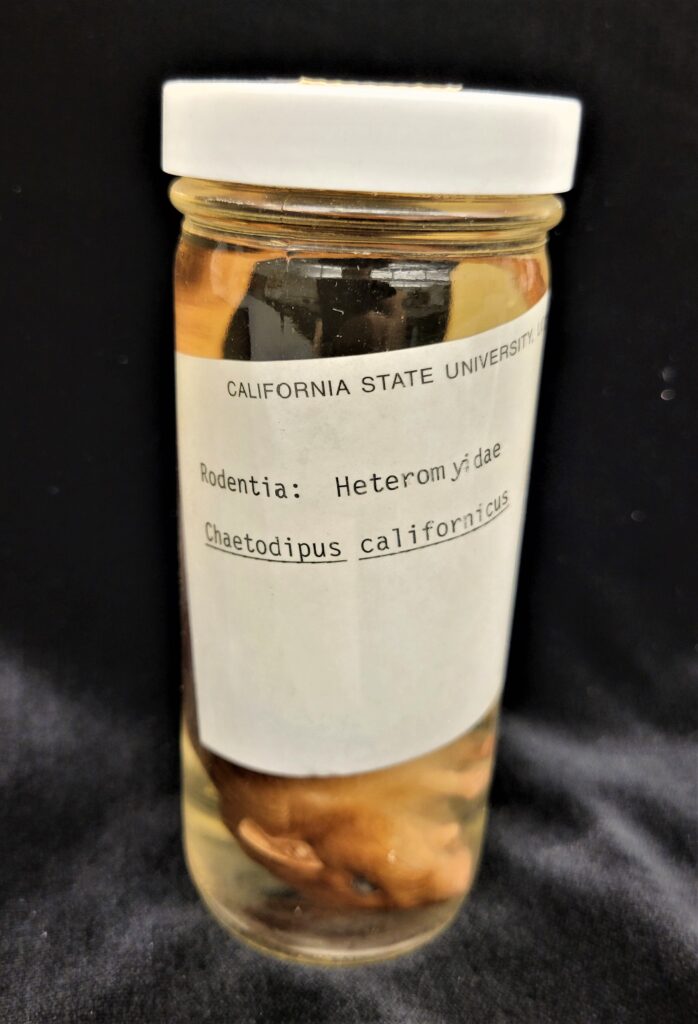
For fluid preparations, the specimen is first submerged in a fixing solution (formaldehyde and water) to halt the deterioration and decay process. Then it is put into a tightly sealed glass jar or other container filled with a fluid preservative, most commonly ethanol or isopropyl alcohol, for long-term storage. An identifying specimen tag (see below) is also inserted into the jar. Fluid preservations are most commonly used with aquatic invertebrates, fish, reptiles, and amphibians, and these specimens may last hundreds of years in this state, although they may shrink, swell, or discolor over time.
Study Skins, Skulls, & Skeletons
The most common way that mammals are preserved, however, is in a dry state. Before skinning, the preparer will write out one or more museum identification tags (see below) and take a variety of measurements of the whole carcass (head-body length, tail length, foot length, ear length, and body mass). Specimens are first skinned using scissors, a razor blade, or knife. The preparer may slice the skin down the ventral surface of the animal, pull the skin away from the muscular trunk, and then separate the skin from the legs, head, and tail. Usually, if the mammal is small, the bones are left in the paws; otherwise the paws are skinned entirely leaving just the claws, hooves, or nails in the skin. A preparer may also leave the feet and claws attached to the skeleton on one side, and attached to the skin on the other side. The tail bones may be extracted by pulling them out of the skin in one smooth movement, or by slicing the tail along its ventral surface and peeling the skin off. In the end, the preparer is left with a loose skin with no bones in it and a skeleton with muscles attached. Watch this video of the process of measuring and skinning a rodent.
The skull and bones may then be cleaned using a variety of processes. First, most of the muscles and organs should be cut away from the body and discarded so that the next step goes more quickly. The most common cleaning method is using flesh-eating dermestid beetles. A large colony of beetles in a dedicated tank can completely eat the flesh off of even large skeletons in a matter of days. Alternative methods of removing flesh are boiling, which requires care in order to not damage the bones, and maceration, which involves submerging bones in a container of water for weeks at a time to let bacteria gradually eat away and remove the meat from the bones.
When all of the meat is off of the bones, many preparators prefer to degrease them to remove natural oils and fats still remaining inside the bone (these make the bones appear brown and feel sticky). Degreasing is most commonly accomplished by soaking the bones for several weeks in ammonia or acetone, changing the solution regularly. Once the degreasing is complete, the bones are either left with their natural coloration or may be whitened for a more attractive/clean specimen. Whitening simply involves soaking the bones in diluted hydrogen peroxide for hours or a few days, depending on the specimen.
When the bones are cleaned and whitened, collections managers will assign a collection catalog number to the specimen and write that number with permanent ink on every single bone. The bones, if left loose, are typically housed in an appropriately sized cardboard box, and the skull may go in the same box or be stored separately with its own museum identification tag (see below).
With the loose skin, the preparer usually creates a museum study skin if the animal is medium or small in size or tans the hide if it is a large mammal. Creating a study skin is not the same thing as taxidermy. To make a study skin, the preparer will stuff the animal with rolled cotton (or some other soft absorbent material) and slide wires and/or wooden dowels into the legs, tail, and head so that the animal is posed with its legs outstretched in front and behind it, footpads down, and the tail straight behind (unless it is very long in which case it is curled back on itself). The skin is then sewn up with a needle and thread, pinned in position on a surface, and left to dry for days or weeks. A museum identification tag (see below) is then attached to the preserved specimen as it dries. These study skins are stored in large flat drawers in cabinets of museums, so their limb positions allow skins to be lined up in tight, compact formations for more efficient storage. Watch this video of the process of stuffing and pinning the rodent skin.
Specimen Identification Tags
All museum specimens are assigned an official specimen catalog number; the number is written directly on skulls and bones, but study skins (and sometimes skulls) have a paper tag attached to the specimen (as you saw in the videos above). This number identifies the specimen in the collection’s catalog. The specimen tag also has a variety of other important identifying information on it that will be useful to you. Look at the tag of a specimen. On one side of the tag is the species name written in pencil; writing in pencil allows us to change the name when taxonomists assign new nomenclature to a species or split it in two. The rest of the tag is written in ink, as the information is permanent. The catalog number may appear in different locations on the tag, depending on who fills it out. The catalog number is either in the upper right corner on the side with the species name or sideways next to the hole on the tag.
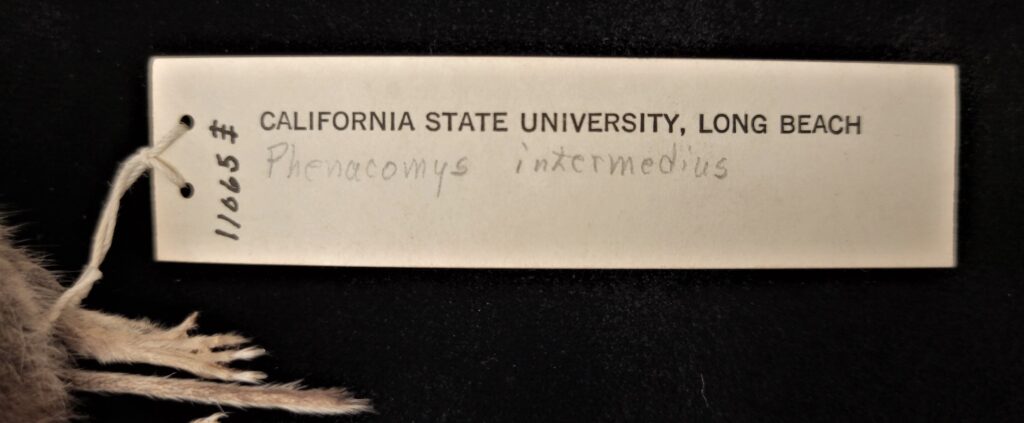
On the reverse side of the tag, you will find information on the location and date the animal was collected or trapped, who collected it, who prepared the specimen, the sex of the animal, the catalog number, and possibly a series of measurements. These measurements, when complete indicate:
Total Length – Tail Length – Hind Foot Length – Ear Length ≡ Body Mass
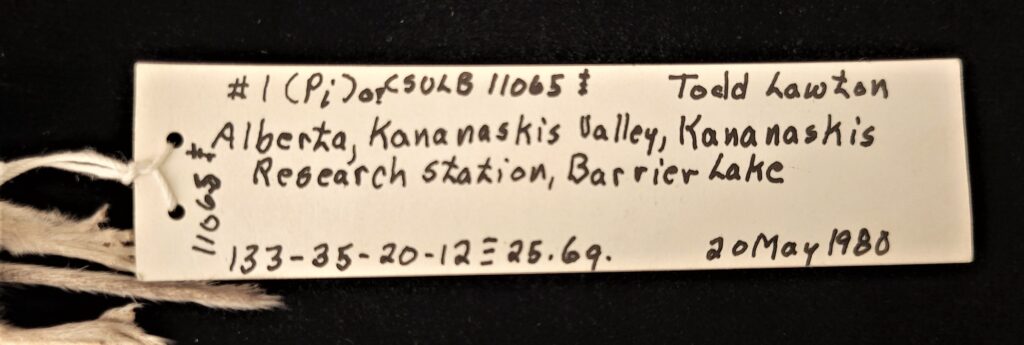
These measurements are taken before the carcass is skinned, as the skin tends to stretch out as it is removed, which would distort any future measurements. As a result, the body length of the prepared study skin is usually a bit longer than the original carcass measurement. Using a specimen in front of you, use a ruler to confirm the measurements are close to what is written on the tag. Also, see how the catalog number on the skull matches the one on the skin; that way you know that skull belongs to that specific skin.
As you go through each lab, refer to the specimen tag to determine which species you are looking at, and compare catalog numbers on skulls and study skins to figure out which skull matches belongs to each study skin.
Zoogeography
The world can be divided up into zoogeographic regions (proposed by Wallace 1876 and recently revised by Holt et al. 2013). A species is endemic to an area of it is native to a given geographic region and not found anywhere else. As you learn about different mammal taxa, you will learn what zoogeographic region each group is endemic to. Often times, species from very different taxonomic groups look and behave very similarly but live different zoogeographic regions. Further, the distribution of species can sometimes be explained by historical zoogeography (the study of originations, extinctions, and migrations over time) where plate tectonics and movement of the continents demonstrates why some areas might be very close to each other geographically but have very different species composition because their plates were once quite far apart (e.g., Oriental and Australian zones). Below is the revised zoogeographic zone map of Holt et al. 2013. The zone names used in subsequent taxon diversity modules use the nomenclature below.
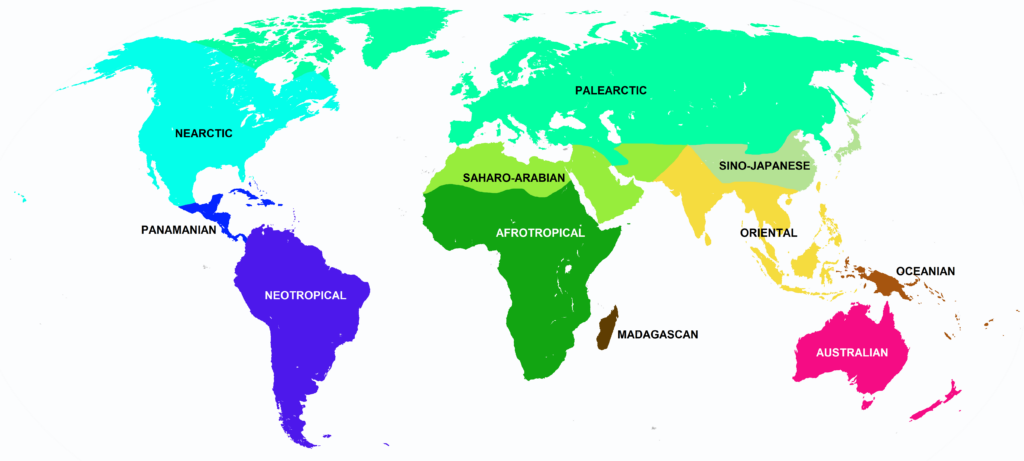
Redrawn from Ben G. Holt et al. Science 2013;339:74-78
Dental Formula
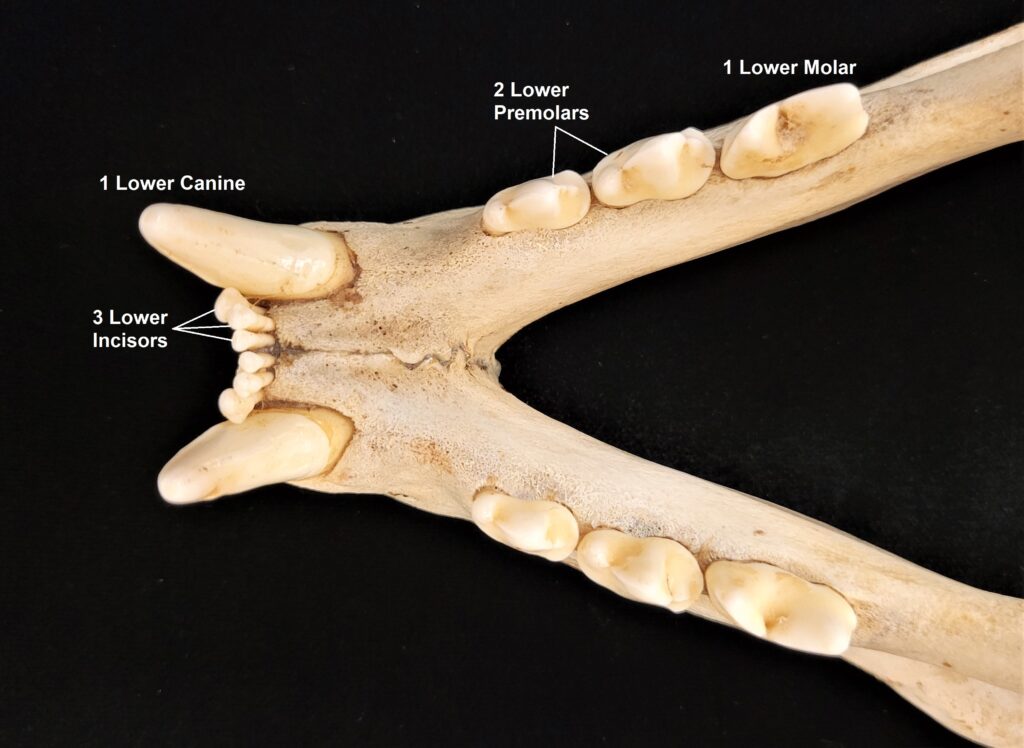
A dental formula is a system for recording the numbers of incisors, canines, premolars, and molars that an animal has. Because most mammals have the same numbers of teeth on the right and the left, a dental formula refers to only one side of the mouth at a time. In mammalogy, we use dental formulas to help distinguish different taxa, as different groups have varying numbers of each type of tooth. Sometimes simply counting the number of incisors or cheekteeth (premolars + molars) can help you identify a skull!
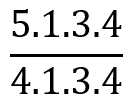
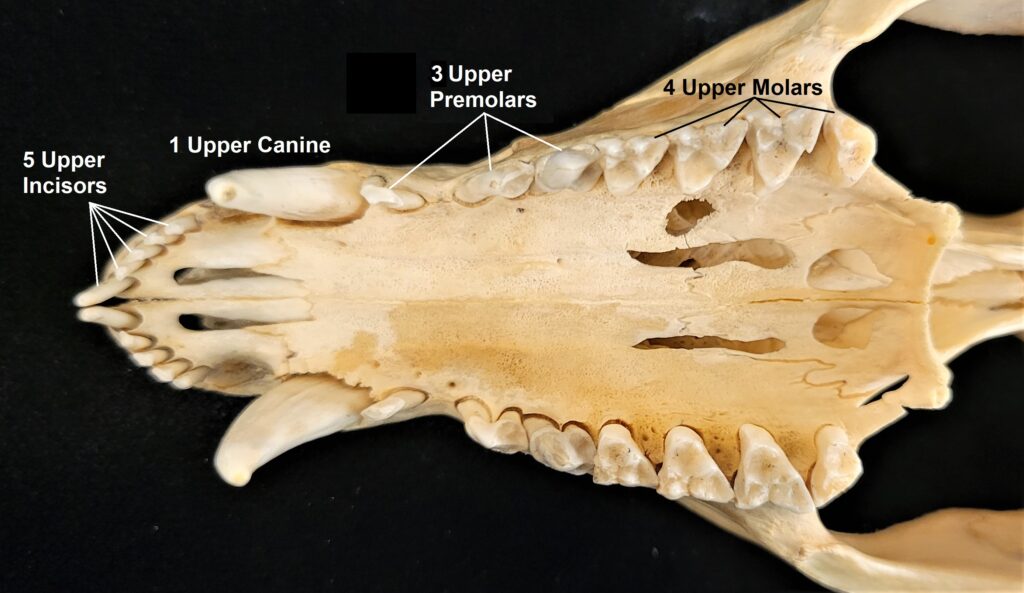
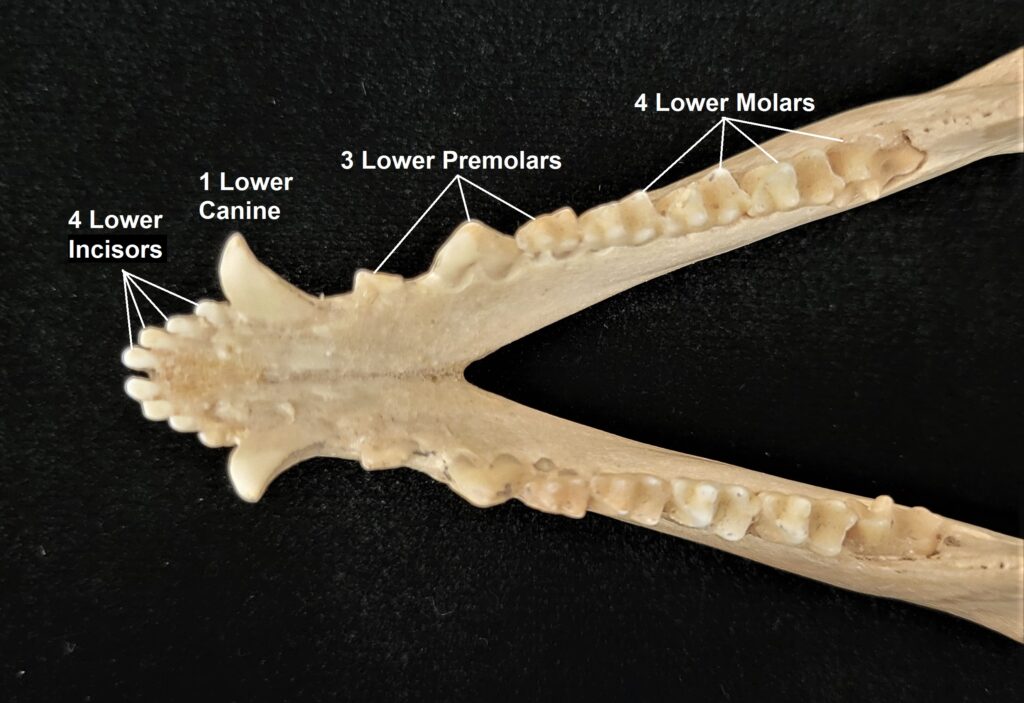
Dental formulas can be written in a variety of formats but they all convey the same information: the number of each type of tooth on one side of the mouth on the top and on the bottom. An opossum (Didelphis virginiana) is a relatively primitive mammal with close to the maximum number of teeth found in mammals. An opossum has, on one upper side 5 incisors, 1 canine, 3 premolars, and 4 molars, and on one lower side it has 4 incisors, 1 canine, 3 premolars, and 4 molars. The dental formula as: 5.1.3.4/4.1.3.4 or:
Use an opossum skull and/or the image below to identify each tooth type by the numbers in the formula.
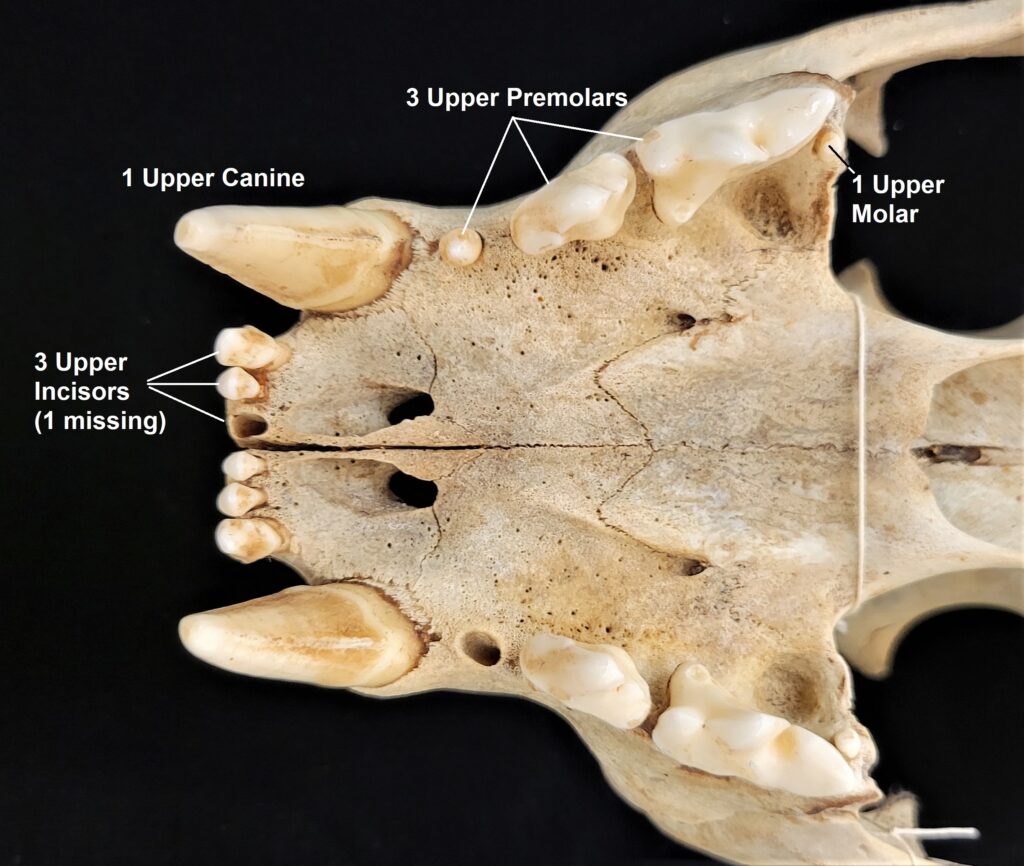
The primitive dental formula exemplified by the opossum has been modified in other mammal lineages. Further, the number of certain types of teeth will vary between individuals of a species or between species within a family, and we may write that range of numbers into the formula using parentheses. The dental formula for a mountain lion (Puma concolor) is 3.1.(2-3).1/3.1.2.1. Examine a mountain lion skull and/or the images below to find the different types of teeth. Watch out! That last upper molar on the mountain lion is tiny!
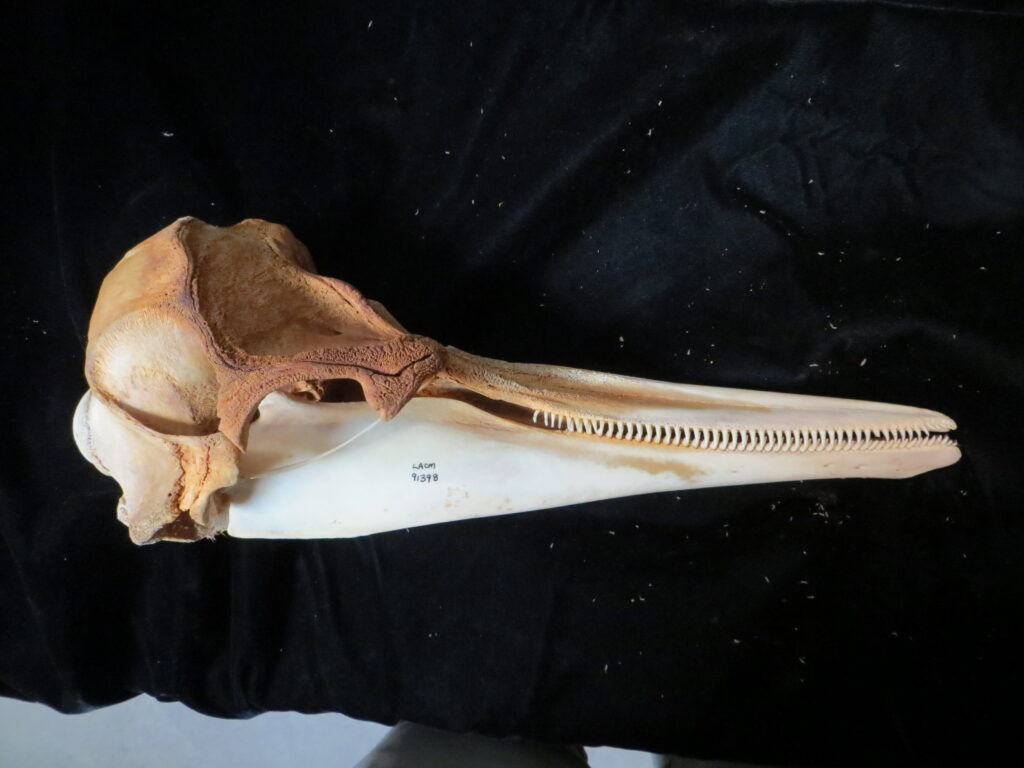
In some groups, it may not be clear if certain teeth in the skull are premolars are molars, and we may combine the two tooth types in a dental formula (e.g., 1.0.(2-3)/1.0.(2-3)). Sometimes teeth can be so modified that it is difficult to determine dental formula. For mammals that have more homodont dentition like porpoises, sloths, and armadillos it’s more difficult to use dental formulas.
Check out this fantastic collection of 3D skulls with teeth painted according to type on SketchFab.
Mammal Identification
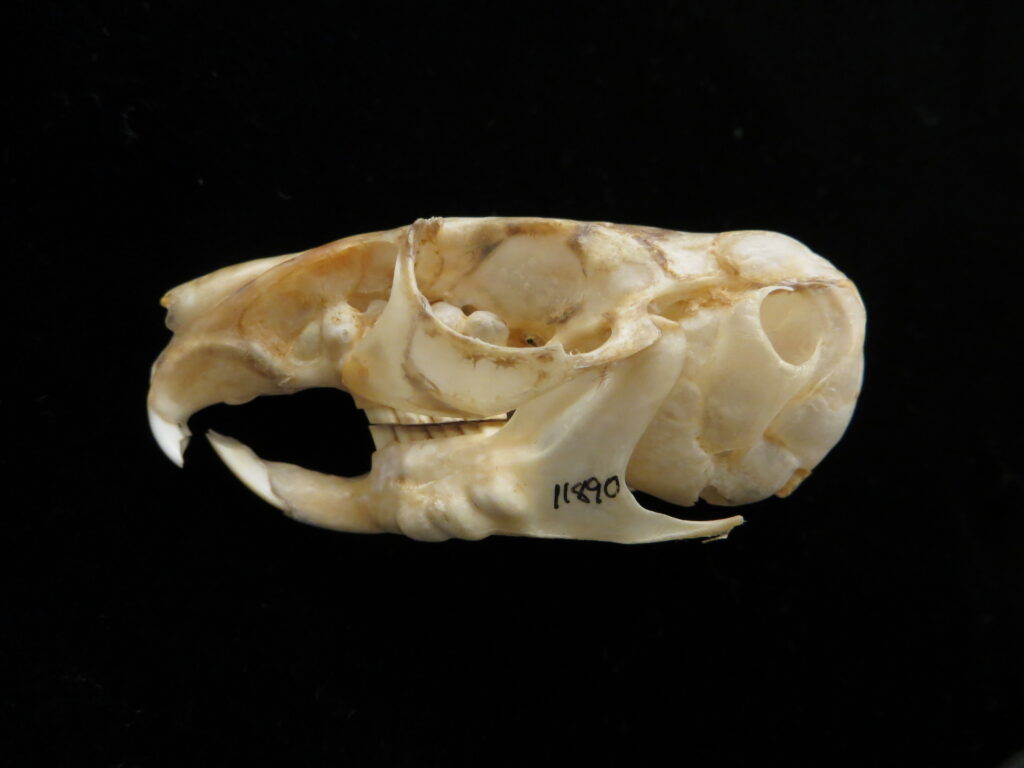
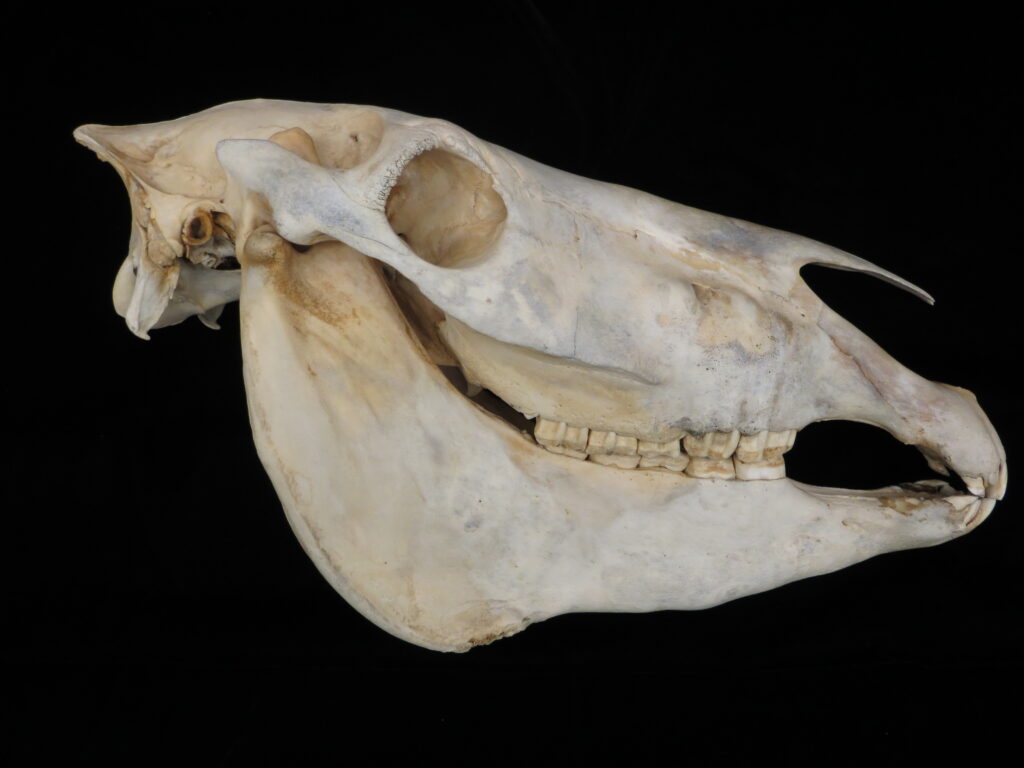
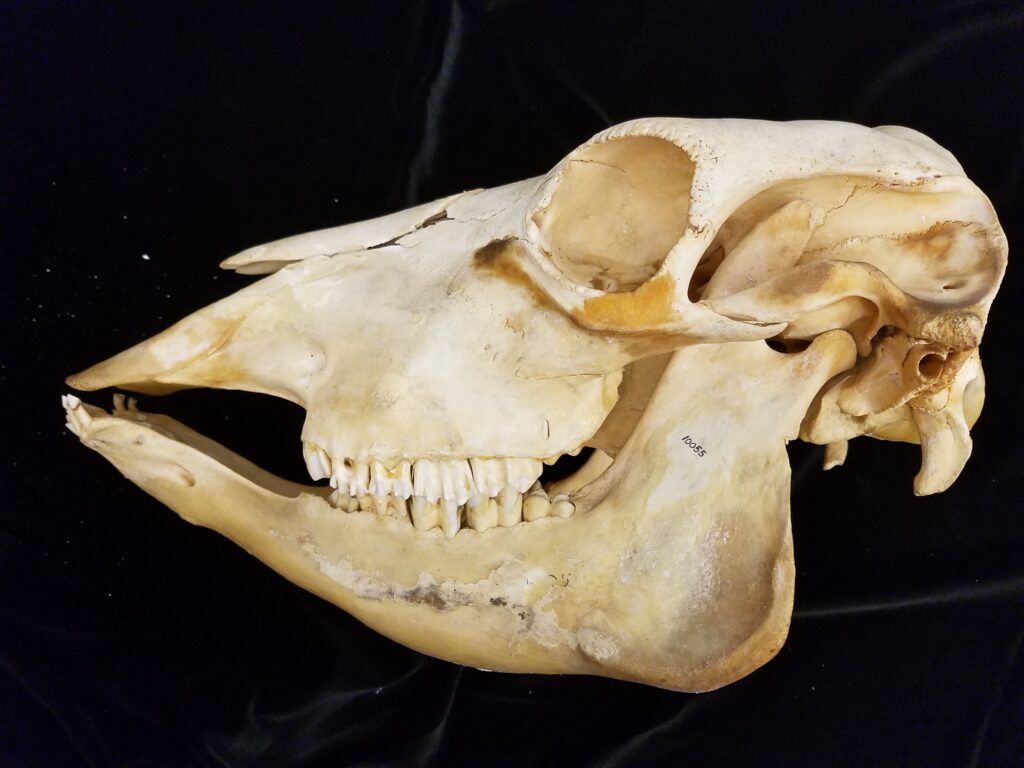
Being able to quickly identify a skull or a trapped animal in the field down to species is a critical skill for any mammalogist (and it will undoubtedly be important for you to learn to identify different mammal orders, families, or even species from museum study skins and skulls in the lab). Granted, after doing preliminary research and conducting pilot trapping sessions, most mammalogists know which species they are likely to capture at any given site and can learn to quickly identify a subject down to species by site from memory. But one of the best tools we have for distinguishing between species are dichotomous keys, which allows the user to identify something by answering a series of questions, beginning with broad differences and ending with a species name. The questions are grouped in to couplets, or pairs of characteristics (e.g., 1A: Body larger than 10cm; 1B: Body less than or equal to 10cm). Each line of a couplet directs the user to another couplet for a different question. Eventually, the couplets get more and more specific until even the most similar looking species can be distinguished.
Most local field guides have dichotomous keys to the species that are found in that region, allowing the user to fairly quickly narrow down what species they are looking at while still in the field.
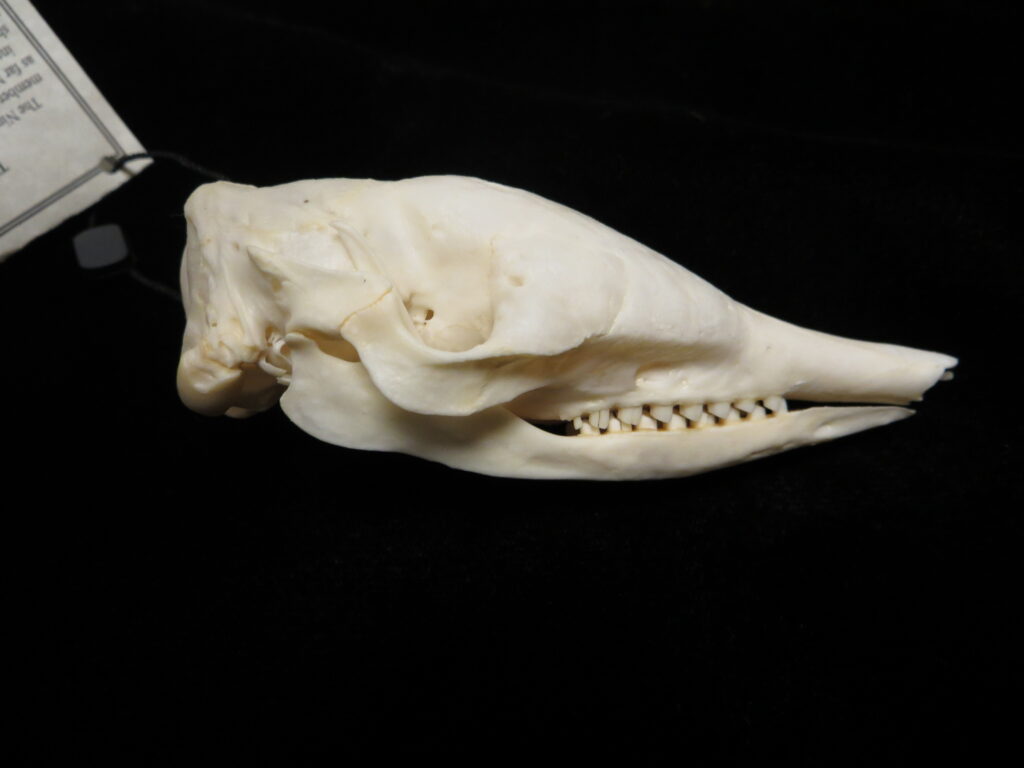
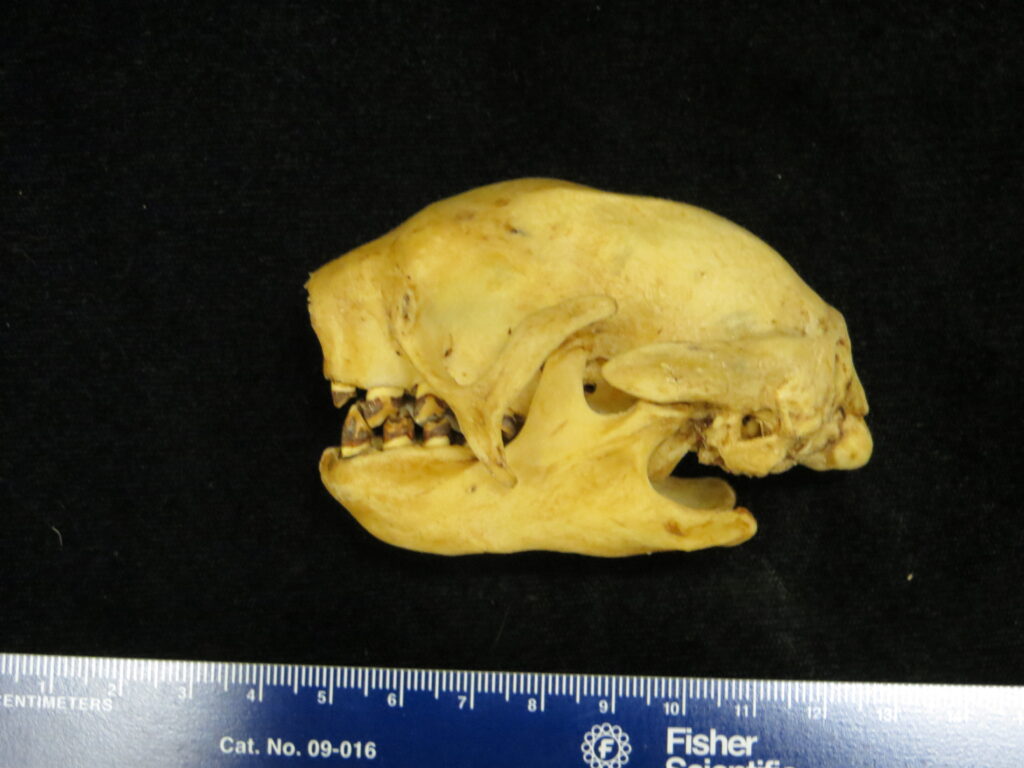
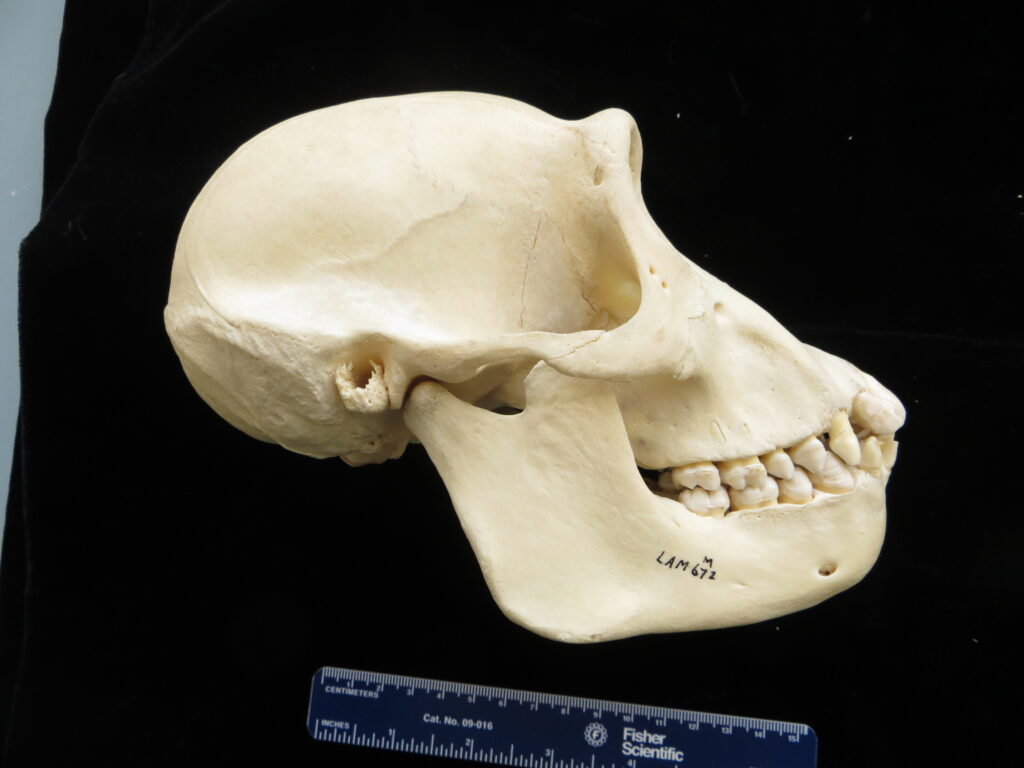
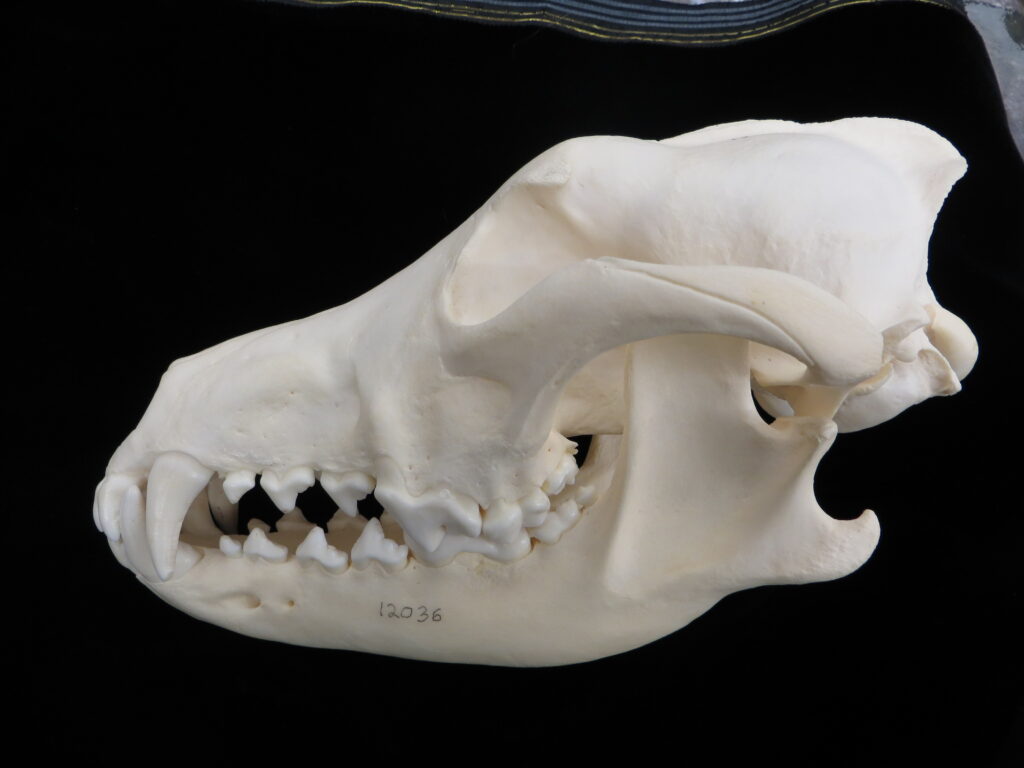
Here is a basic key to the skulls of some major mammalian orders, followed by images of their skulls to practice with. Look at each skull, one-by-one, and work through the key to see if you can identify it and land on the proper couplet. Click on the images to zoom in to see more details.
| Couplet / Dichotomous trait | Go To Couplet / Order | |
| 1A Teeth absent 1B Teeth present | 2 3 | |
| 2A Zygomatic arch present 2B Zygomatic arch absent | Monotremata – echidna Pilosa – anteater | |
| 3A Homodont teeth 3B Heterodont teeth | 4 6 | |
| 4A Skull <6″ long, teeth blunt 4B Skull >6″ long, teeth pointed | 5 Cetacea – dolphin | |
| 5A Zygomatic arch complete 5B Zygomatic arch in complete | Cingulata – armadillo Pilosa – sloth | |
| 6A Eye sockets face forward 6B Eye sockets on side of head | Primates – chimpanzee 7 | |
| 7A Canines large, no gap btwn teeth 7B No canines, large gap btwn teeth | Carnivora – dog 8 | |
| 8A Incisors 1/1 8B Incisors not 1/1 | Rodentia – chinchilla 9 | |
| 9A Upper incisors present 9B Upper incisors absent | Perissodactyla – horse Artiodactyla – cow |
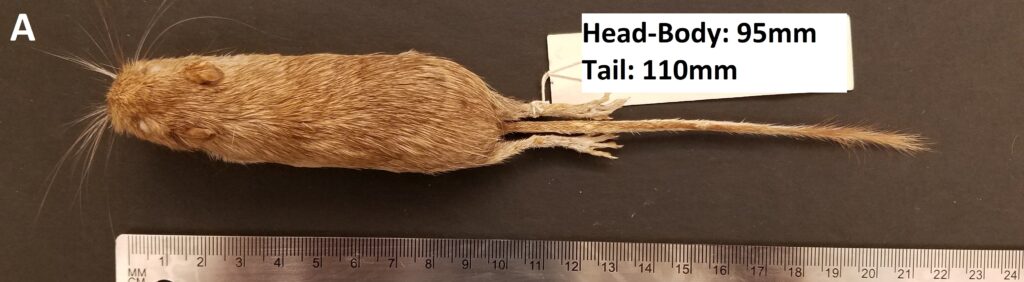
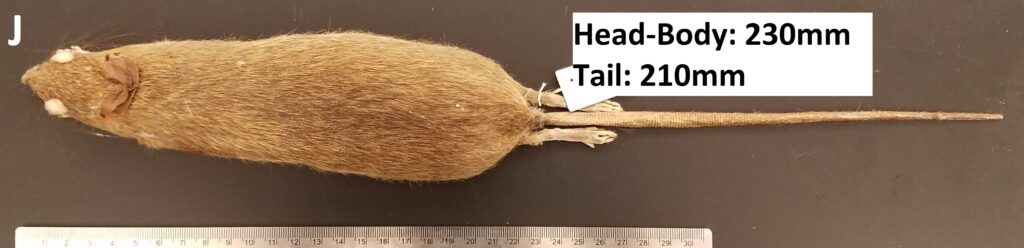
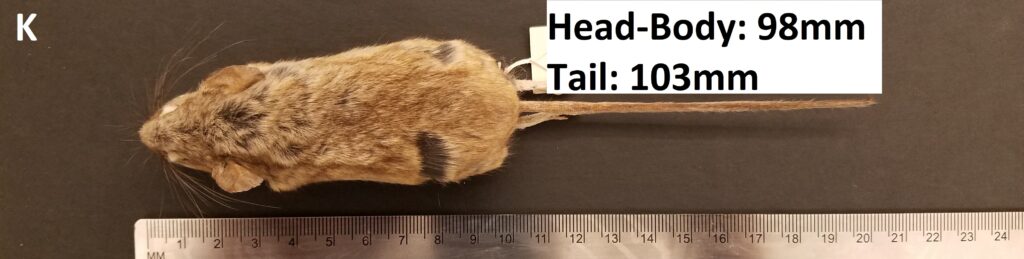
External Field Identification
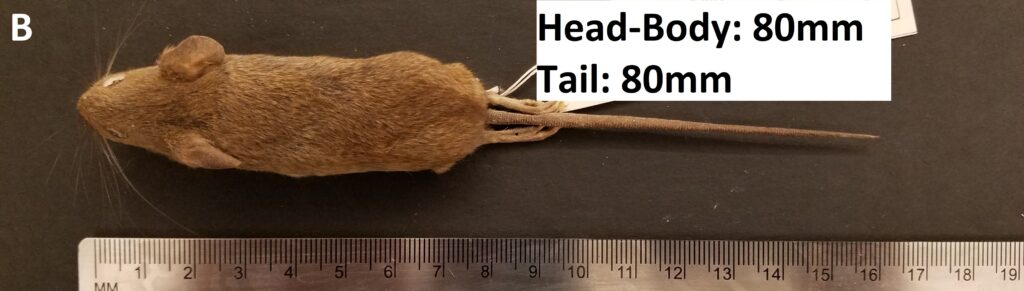
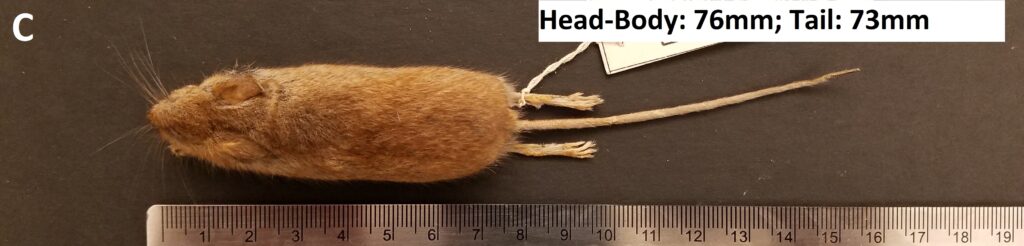
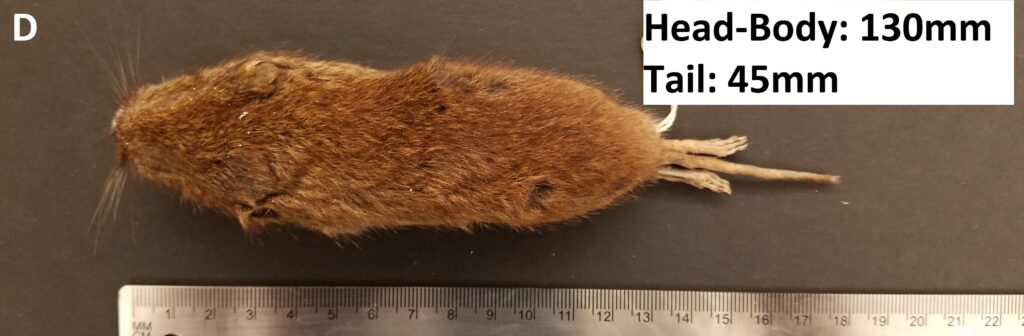
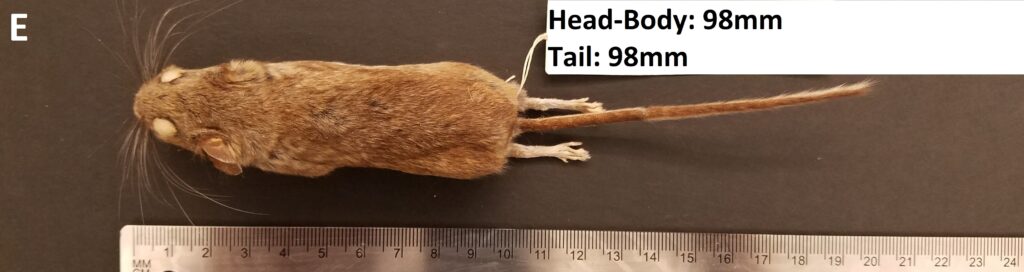
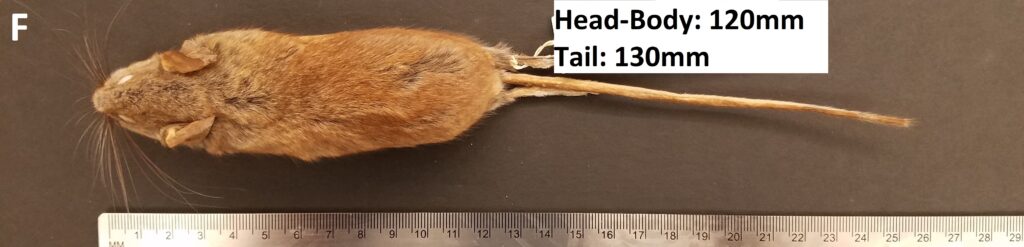
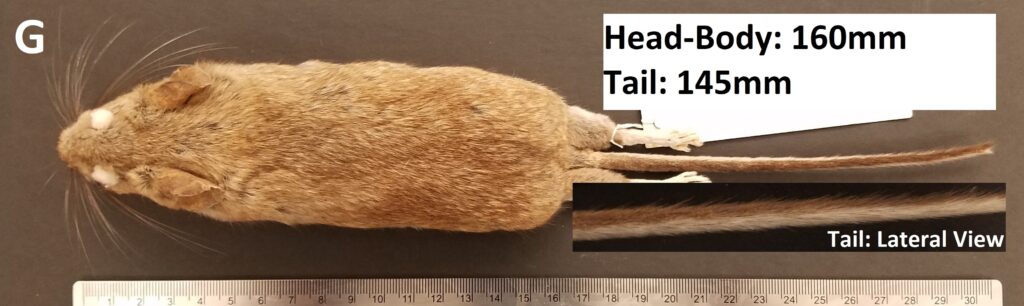
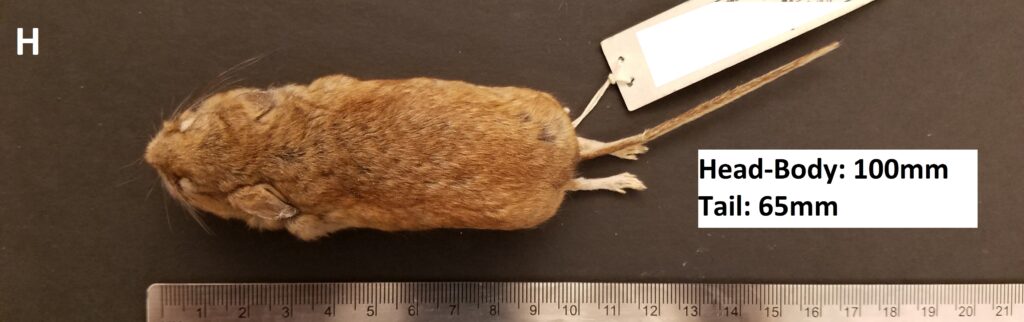
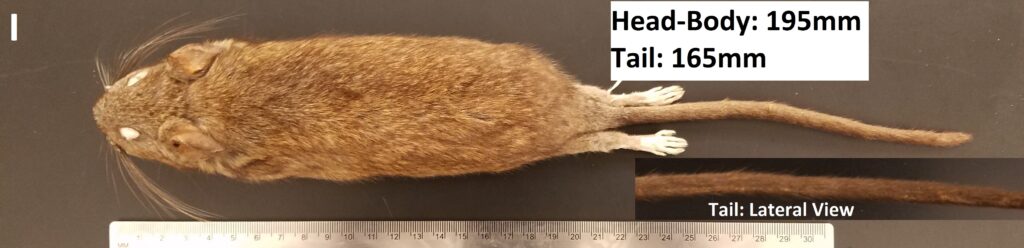
Using a field guide on live rodents you’ve just caught in the wild requires the use of more subtle morphological traits on the external body of the animal, instead of the skull. Pacific sage scrub habitat on the west coast of California is home to a diverse array of small mammals. Researchers have been surveying these populations in various capacities for over 100 years. One such study looked at small mammal populations in sage scrub habitats and urban/suburban habitats in Southern California, identifying 11 species found between the two habitat types. Below is a sample dichotomous field key created for this system (typically keys include foot, ear, and skull measurements as well). See if you can use the key to identify the species in the images below.
| Couplet / Dichotomous Trait | Go To Couplet / Order |
| 1a Tail length less than 1/2 body length (very short) 1b Tail length greater than 1/2 body length | Microtus californicus 2 |
| 2a Hindlegs/feet long, specialized for jumping, elongated tail with tufted tip 2b Hindlegs/feet shorter, not specialized for jumping | Chaetodipus californicus 3 |
| 3a Naked or nearly hairless tail 3b Short-haired tail | 4 5 |
| 4a Small body size (<23 cm head-tail) 4b Large body size (>32 cm head-tail) | Mus musculus Rattus rattus |
| 5a Large body size (>26 cm head-tail), white/buff ventrum, dorsum brown/gray 5b Small body size (<26 cm head-tail) | 6 7 |
| 6a Tail very faintly bicolored 6b Tail conspicuously bicolored | Neotoma macrotis Neotoma bryanti |
| 7a Body very short (< 15 cm head-tail) 7b Body longer (>15 cm head-tail) | Reithrodontomys megalotis 8 |
| 8a Tail length less than or equal to body length 8b Tail length greater than body length | 9 10 |
| 9a Tail length about equal to body length 9b Tail length less than body length | Peromyscus boylii Peromyscus maniculatus |
| 10a Total length usually less than 23 cm 10b Total length usually greater than 23 cm | Peromyscus fraterculus Peromyscus californicus |
References
Holt, B.G., Lessard, J.P., Borregaard, M.K., Fritz, S.A., Araújo, M.B., Dimitrov, D., Fabre, P.H., Graham, C.H., Graves, G.R., Jønsson, K.A. and Nogués-Bravo, D., 2013. An update of Wallace’s zoogeographic regions of the world. Science, 339(6115), 74-78.
Wallace, A.R., 1876. The Geographical Distribution of Animals, Cambridge Univ. Press, Cambridge.